General Server Settings
General server functions and basic settings you'd like the server to use when making calls, logging. etc. are set in the General Server Settings.

Tip: If you want to hide or expand one of the sections, click the plus / minus sign at the end of the section name.
Usage
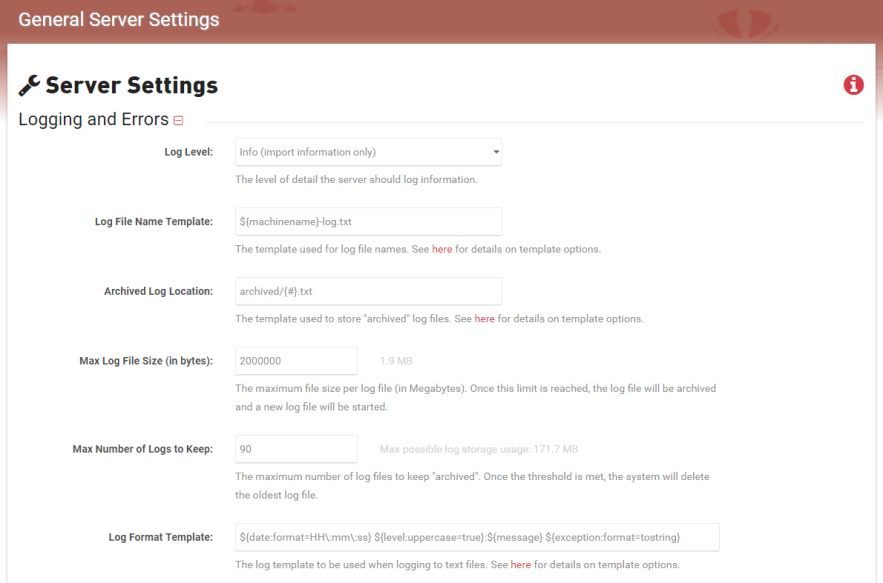
The log level setting sets the level at which the server will write message logs and how granular the logs are written. The levels are listed hierarchically based on the amount of information & messages logged, meaning that each successive level will include the messages of the log levels below it. For example, the default setting is Info, so in addition to Info messages, Warn, Error and Fatal messages are also included.

To Use:
- Select the log level you wish to use from the dropdown.
Options include:- Trace – very fine details and ALL log messages available will be logged
- Debug – all messages that may be of value in order to debug and troubleshoot
- Info – informational messages only
- Warn – only errors and warnings
- Error - (errors only)
- Fatal – fatal errors only
- Click Save.
Heads Up! Performance may be impacted when using Trace or Debug due to the increased number of messages logged.

The Log File Template allows you to configure the layout renderer macro template used for log file names. The default is $(machinename) which will use the name of the machine the process is running on in the name. You can find more info here about the different layout renderer macros that can be used.
To Use:
- Enter the desired layout renderer macro following by -log.txt.
- Click Save.

The Archived Log Location setting allows you to configure the location and file name for archived logs. By default, the logs are saved to the archived folder and named with the date of the log, for example: 2017-08-09.0.txt. You can find more info here about the different layout renderer macros that can be used.
To Use:
- Enter the desired layout renderer macro into the curly braces and update the folder location if desired.
- Click Save.

The Max Log File Size setting allows you to configure the maximum size a log be in megabytes. As stated in the above image, once the limit is reached, the log is archived and a new log file is started.
To Use:
- Enter the desired size limit in megabytes.
- Click Save.

The Max Number of Logs to Keep setting allows you to set a maximum number of logs to keep archived. Once the threshold is met, the system will delete the oldest log file.
To Use:
- Enter the desired number of logs to keep.
- Click Save.

The Log Format Template setting allows you to configure the layout renderer macro template used for logging text files. You can find more info here about the different layout renderer macros that can be used.
To Use:
- Update the layout renderer macros in the template string.
- Click Save.
The number set here represents the max number of records that can be returned through a web request, at one time. Enter 0 for no limit.
To Use:
- Enter your desired max number of records into the field.
The number set here represents the max number of records (or groups of data) to query for, when processing data in chunks.
To Use:
- Enter your desired max number of records into the field.
The max set here determines the max number of seconds a database connection will remain open before timing out. For no timeout, enter "0."
To Use:
- Enter your desired max seconds into the field.
When inserting data in bulk, the number set here determines the max number of records to keep in memory before committing to the database.
To Use:
- Enter your desired max number of records into the field.
Check this option if you want to prevent the system from automatically adding quotes around database field names, when executing SQL statements.
To Use:
- Check/uncheck the box to turn on/off.
The number set here determines the default number of days you wish to keep job information. After the specified number of days has expired the job (and any associated files) will be deleted. A job typically consists of exported files, reports, etc.
To Use:
- Enter your desired default number of days to keep a job into the field.
The number set here determines the number of seconds to update the status of a job. For example, a value of "30" will update the progress of a long running job every 30 seconds (will update the progress of the job).
To Use:
- Enter your desired default number of seconds in the field.
This setting determines whether the server can cache commonly requested resources so that it doesn't need to continually make requests to the database, unless a change is found.

To Use:
- Check the checkbox to enable.
- Uncheck the checkbox to disable.
The reset button can be used to reset all the general server settings back to the defaults.
Heads Up! Be aware that a few other settings that are not visible in this form, such as the mail server settings, will also be reset.
